
July 2, 2026 |
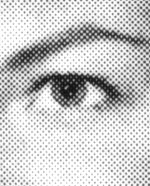
Typical moiré pattern caused by screen printing.
The screening technique used in offset and plate printing creates a moiré pattern (blotches or wavy lines) across photos when they are scanned. This can be overcome by the following Photoshop technique. (Your scanner may have software settings that do essentially the same thing. Experimentation can help you determine the best solution.) We've used Photoshop filters, but the same result can be achieved with other software.
- Scan the photo at a higher resolution than the eventual output, using your scanner's default settings (do not use "tools" that came with your scanner). E.g., if you plan to reprint the photo on a laser or bubble jet printer, scan at 600 dpi. Go to an even higher resolution if the original is tiny.
- Save a copy to disk in case you want to do steps over.
- Use Photoshop's Filter:Blur:Gaussian Blur filter, blurring the photo by 1-2 pixels (this is about 1/600 loss of resolution).
- Use the Filter:Sharpen:Sharpen Edges filter to recover detail; this will bring facial features, etc., back into focus.
- Resize the photo to 300 (print) or 72 (web) pixels/inch. Sometimes you'll want to save one of each.
- (optional). Sharpen Edges again and look at the result. If "jaggies" (points along lines) appear, then UNDO the latter sharpen edges.
This should give you a presentable picture. It often yields results superior to built in moiré removal features in scanner software. It's all in the eye of the beholder, of course. Good luck.
Oh, yes. Call this "Item Zero" in the above list: Naturally, you should check the copyright on printed material before you use it. Don't copy other people's work without attribution. "Fair Use" allows news publishers to use portions of works in reviews and commentaries. At the very least you should not assert that others' work is your own.
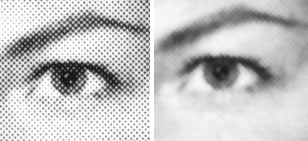
Detail of image shows dots that coalesce into moiré pattern when viewed at smaller scale. A gentle blurring turns the dots into a continuous tone.
Comparison
Here's a comparison of different treatments of the same photo from a school yearbook. A scan at 300 dpi has hundreds of tiny dots that make up an image. When the same photo is blurred and then edges are sharpened, the result is a continuous variation of tone. Similar effects occur in a color photo. You might find it instructive to back away from your screen to see how viewing distance affects the two views.
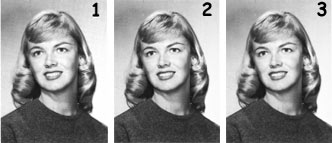
Results
Below are three variations on scanning and processing a photo. (1) shows the photo scanned and saved at 72 pixels per inch. (2) shows the photo scanned at 600 ppi and saved at 72 ppi with no manipulation. (3) shows the result of the technique described above. Note the smoother skin tone, equal contrast in the hair and sweater, and removal of printing and scanning artifacts in the background. (If you can't see a difference, you're looking at the subject, not the photograph. Understandable rookie mistake; no demerits.) Naturally, these effects are even more pronounced at higher print resolution.
Oh, to be 17 again, moiré or none.